Torque Values

My Torque Values:

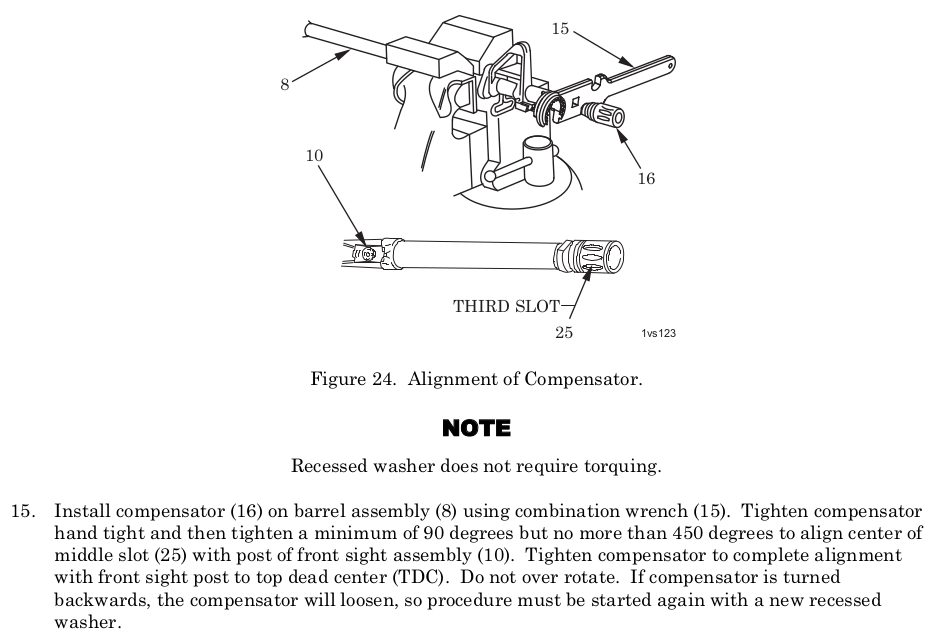
AR Compensator (Flash hider) No Torque, timing value with the procedure in the Army TM. Hand tight and then tighten a minimum of 90 degrees but no more than 450 degrees to timing. Don’t over tighten, don’t loosen.

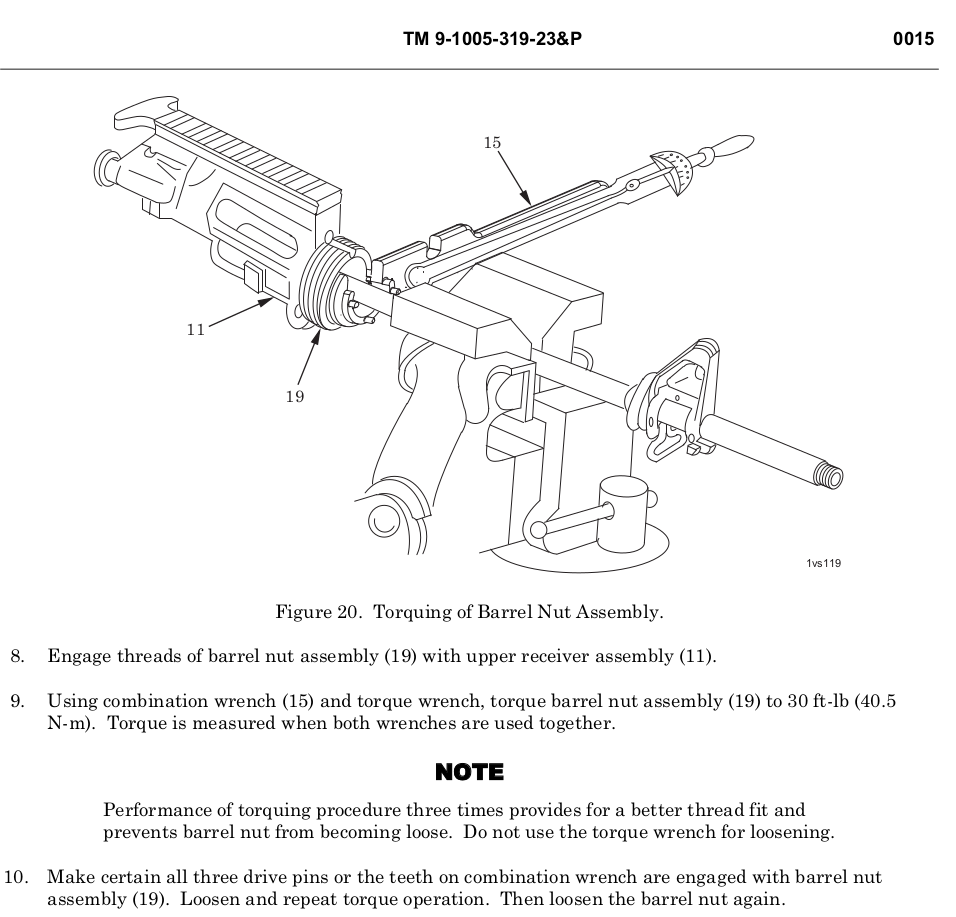
AR Barrel Nut 30 Ft. lbs. Minimum, not to exceed 80 Ft. Lbs. to align the next slot in the barrel nut. The 80 Ft. Lbs is not stated in the TM, but I don’t know how you would line up the gas tube, without going over 30 Ft. Lbs. Unless you use shims. I don’t think most folks will have any laying around. This torque spec is common across the community and internet.

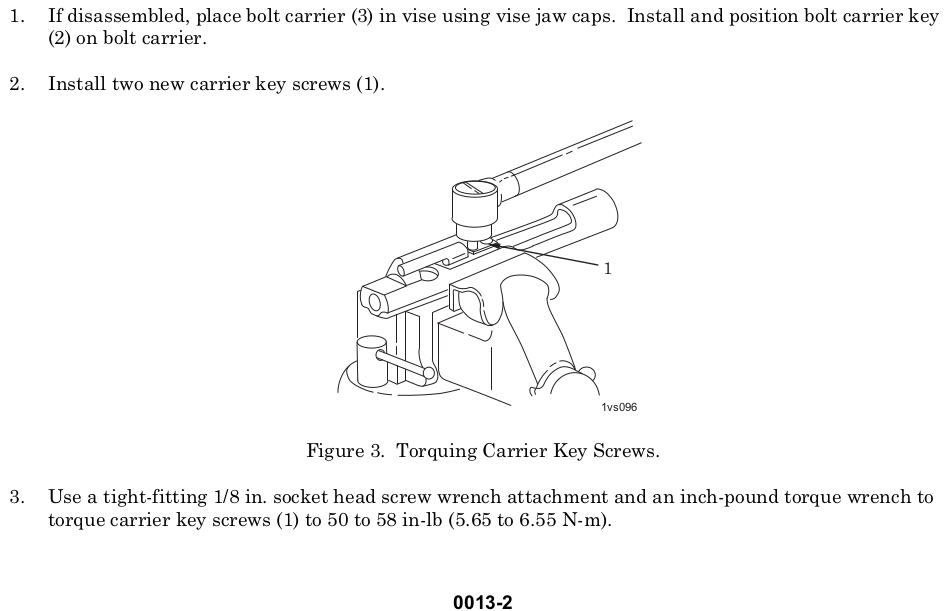
AR Carrier Key Screws 50-58 INCH pounds torque

AR Lower Receiver Extension (Buffer Tube/Castle Nut) 40 Ft. lbs for both Rifle and Carbine.

M-LOK Accessories:

For attaching metal accessories to metal hand guards: 35 in/lbs

For attaching polymer or metal accessories to polymer hand guards: 15 in/lbs

For attaching polymer accessories to metal hand guards: 15 in/lbs

The installation torque values are not minimums, they are recommended limits. The nylon patch compound may slightly affect the torque reading if using an in/lb torque wrench.

Using a small hex wrench should prevent over-tightening. Remember that the recoil lugs are doing most of the work, and excessive torque on the nuts is not required

My Comments:

The rest of the items in the research below I could not find in the Army TM, manufacture website or in common reference. Until I can find it, I am going with ‘tight’ and the appropriate thread lockers. ‘Tight’ might be the values listed.

I am not saying that the info below is wrong or bad. I could not readily verify it. The above is what I will use, at the end of the day I am responsible for my decisions and you are responsible for yours.

########### RESEARCH ITEMS BELOW ###########

AR Compensator (Flash hider), 15-20 Ft. Lbs. Torque *1

AR Compensator (Flash hider) *3 (No Torque, timing value)

Army TM Flash Hider
Army TM Flash Hider

AR Handguard Screws, 20-30 inch pounds torque *1

AR Gas Block Set Screws, 25-30 inch pounds torque *1

AR Barrel Nut, 30 Ft. lbs. Minimum, not to exceed 80 Ft. Lbs. to align the next slot in the barrel nut. *1 *5

AR Barrel Nut, 30 Ft. lbs. *3 (I cant find the 80 Ft. Lbs. In the TM)

Army TM Barrel Nut
Army TM Barrel Nut

AR Carrier Key Screws, 50-58 INCH pounds torque *1 *2 *3

Army TM Gas Key
Army TM Gas Key

AR Grip Screw, 15-20 inch pounds torque *1

AR Lower Receiver Extension (Buffer Tube/Castle Nut)

Rifle: 35-39 Ft. Lbs. *1 *3

Army TM Lower Receiver Rifle

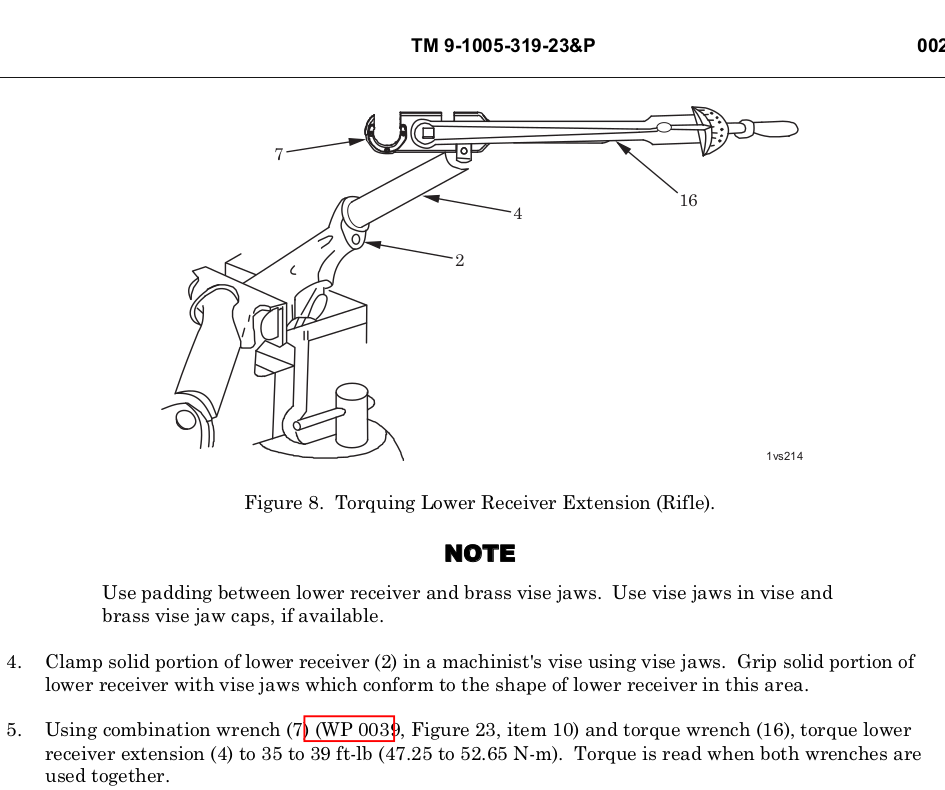
Carbine: 38-42 foot pounds *1 *3

Army TM Lower Receiver Carbine

M-LOK Accessories: *4

For attaching metal accessories to metal hand guards: 35 in/lbs

For attaching polymer or metal accessories to polymer hand guards: 15 in/lbs

For attaching polymer accessories to metal hand guards: 15 in/lbs

The installation torque values are not minimums, they are recommended limits. The nylon patch compound may slightly affect the torque reading if using an in/lb torque wrench.

Using a small hex wrench should prevent over-tightening. Remember that the recoil lugs are doing most of the work, and excessive torque on the nuts is not required

KeyMod Accessories: *1

Polymer to metal: 15 in-lbs

Polymer to polymer: 15 in-lbs

Metal to metal: 30 in-lbs

Picatinny Accessories: *1

Polymer to metal: 15 in-lbs

Polymer to polymer: 15 in-lbs

Metal to metal: 35-60 in-lbs

Ref:

*1 https://www.youtube.com/watch?v=Ah6WISs6IfY

*2 https://www.youtube.com/c/InstructorChad

*3 ARMY TM 9-1005-319-23&P Nov 2008

*4 https://www.dropbox.com/s/jrf9nwxnizjy6ql/M-LOK_Tips.pdf?dl=0 (Magpul MLOC instructions)

*5 https://www.youtube.com/watch?v=tcMqwofYTn0 (Brownells)

Hit us up with comments or questions

All Documents posted on this site are for informational use only. If you make ANY modifications to your Weapons based on this site, you do at your own risk! If done incorrectly, you can render you weapon unsafe and / or unusable.

More HERE: https://viking-armory.com/?page_id=723

Feed Ramp Polishing

Not all feed ramps need to be polished. If you fire quality ammo with good quality barrel and upper, you might be good. If you reload and like to try different projectiles, cast your own or you are having feed issues, good idea to polish them up.

When I polish feed ramps I do it with the barrel removed from the upper. I am not going to risk screwing something up on the upper. It is more work to remove the barrel but worth the effort for a better finished product.

Here is a before shot:

Feed Ramp Polishing Before

Feed Ramp after polish and clean up:

Feed Ramp Polishing After

Hit us up with comments or questions

All Documents posted on this site are for informational use only. If you make ANY modifications to your Weapons based on this site, you do at your own risk! If done incorrectly, you can render you weapon unsafe and / or unusable.

More HERE: https://viking-armory.com/?page_id=723

AR Magazine Release Tool

I wanted a tool to help get the magazine catch pushed out of my M16/AR-15 without scratching or marring the metal. To compresses the spring and make removal of the magazine catch easier.

Looking around I saw AR Magazine Catch tools similar to mine on various web sites for around $10 without shipping. I am frugal and own a 3D printer, I decided to make one.

I know you can use many other things to push it out, such as, but not limited to, pencil, punch, your kids finger….If you have a 3D printer it is a quick and cheap print.

You can download the STL on Thiniverse

Here are a few pictures:

AR15 Magazine Release tool 03
AR15 Magazine Release tool 04
AR15 Magazine Release tool 02
AR15 Magazine Release tool 01

Hit us up with comments or questions

All Documents posted on this site are for informational use only. If you make ANY modifications to your Weapons based on this site, you do at your own risk! If done incorrectly, you can render you weapon unsafe and / or unusable.

More HERE: https://viking-armory.com/?page_id=723

Keeping it Tight!

I have been working on a Thread Locking (Loctite) Diagram for AR weapons. This is what I have come up with so far.

Thread Locking Chart

Download it HERE

I am starting to read more about the specs of thread lockers. I am pretty sure the document will change.

Hit us up with comments or questions

All Documents posted on this site are for informational use only. If you make ANY modifications to your Weapons based on this site, you do at your own risk! If done incorrectly, you can render you weapon unsafe and / or unusable.

More HERE: https://viking-armory.com/?page_id=723

GLOCK – Armorers course

I recently took the Glock Armors course. It was fun, got to hang out with some like minded individuals and have some good conversation. Both the Instructor and the Sales guy stated several times that Glock is very Military and Law Enforcement oriented and that those groups are around 80% of Glocks business. Any input from anyone but those 2 groups will fall on mostly deaf ears.

If you don’t pass, it is because you don’t want to. That said, I am still out if the “Certification” holds any real value other than a civilian / business being committed enough to spend $250 on some swag. Maybe parts straight from Glock? There is no certification number to identify you, no logo for your business from Glock I could find, no website for customers to verify you are currently certified.

The Law Enforcement customers don’t individually pay for the class or get reimbursed. The LE guys I talked to need continuing education points and like to shoot. The free class is a win-win for them.

In the class I took, the benefits of Certification were never touched on. No idea from the class how to order parts or who to contact if I need something. No “front of the line” if I need help. Law enforcement get a hold of your sales guy. You will get a gray scale certificate in the mail 4-6 week after the class.

I don’t know if I will spend my own money to get re-certified. I just cant think of a benefit for myself. I could buy a lot of Glock factory parts from a reseller for the money I spent, maybe even a new Glock with the GSSF Pistol Purchase Coupon or a good part of it. Ammo and Training….

Class $250

Gas at least $50

Lodging / Meals $100

I do not consider GSSF membership to be part of the value of the Certification. 2 Separate things.

Don’t get me wrong, I will shoot my Glocks until they fall apart. I just don’t see what the certification gives me, what the value is. Over $400 is a lot for lunch, socializing, and a piece of paper no one will ask for.

1-24-23: I have been ordering a lot of parts. I am starting to see a return on my investment. I will keep updating.

Hit us up with comments or questions

All Documents posted on this site are for informational use only. If you make ANY modifications to your Weapons based on this site, you do at your own risk! If done incorrectly, you can render you weapon unsafe and / or unusable.

More HERE: https://viking-armory.com/?page_id=723

Pistol Log Book

I have a log book for each of my pistols. I track what is installed, magazines, rounds fired per barrel and total. I also track, reload data and maintenance.  I wanted to post it here to see if anyone has improvement ideas.

Pistol Log Book

Download it HERE

This is NOT my idea, I am not and dont want to take credit for it. I found pages on the internetz, took what I wanted and put them in a binder.

REF:

https://drive.google.com/drive/folders/0B9BsvElLB2ajTGxpT3l6bEtCcWM?resourcekey=0-vz0mnynOLvf5UtRJoeUuwg

Hit us up with comments or questions

All Documents posted on this site are for informational use only. If you make ANY modifications to your Weapons based on this site, you do at your own risk! If done incorrectly, you can render you weapon unsafe and / or unusable.

More HERE: https://viking-armory.com/?page_id=723

Glock Training Setup II – Adding a Little Flare

I got the Dry Fire Magazine Glock 19 Gen 5 half moon issue described HERE fixed. I designed and printed a magwell insert to plug the half moon and give me a little flare:

Dry Fire Magazine G19 Gen 5 Magwell
Dry Fire Magazine G19 Gen 5 Magwell Flare Insert

Just slide it in:

Dry Fire Magazine G19 Gen 5 Magwell
Dry Fire Magazine G19 Gen 5 Magwell Just stick it in!

And your DryFireMag (DFM) will slide right in:

Dry Fire Magazine G19 Gen 5 Magwell
Dry Fire Magazine G19 Gen 5 Magwell complete

Safety Check…

Install the mag-well and slide the Dry Fire Magazine in:

Need to hold on a bit when removing the DFM

Hit us up with comments or questions

All Documents posted on this site are for informational use only. If you make ANY modifications to your Weapons based on this site, you do at your own risk! If done incorrectly, you can render you weapon unsafe and / or unusable.

More HERE: https://viking-armory.com/?page_id=723

Glock training setup

I have had my MantisX and DryFireMag (DFM) for about a week and 250 ‘shots’. So far they have met all of my needs, I am happy with the purchase.

The only complaint I have is not with the DFM, it is my Glock 19 Gen 5 and the half moon hole in the mag well. It is yet another issue with Glocks short lived half moon.

There is no flare on the cutout, so the DFM pin wont slide in and allow the magazine to seat. You have to manually push the pin in until it is passed the half moon cutout. Then it will slide into position and work like a champ.

Dry Fire Magazine Half Moon

This is not an issue with other Glocks as the magazine wells are flared.

Dry Fire Mag with flared Glock mag Well

Just give it a good push, follow the instructions and you are in business.

When I use the MantisX with the Dry Fire Mag  I want to leave my light on and train as I carry. I would also like to use all my existing holsters for holster drills. To accomplish this I made a base plate with a built in Picatinny rail to mount the MantisX on.

Dry Fire Magazine MantisX Baseplate

It is easy to install. Slide off the factory plate. Dont worry there are no springs that will pop out or parts that will fly. Slide on the new one.

Then Clip on the MantisX

Train.

Hit us up with comments or questions


Glock Compatibility List

A compatibility list for Glock pistols I work on the most. I just went through the parts order form and made a quick reference chart.

Glock Parts Compatibility Chart

Download HERE

Hit us up with comments or questions

All Documents posted on this site are for informational use only. If you make ANY modifications to your Weapons based on this site, you do at your own risk! If done incorrectly, you can render you weapon unsafe and / or unusable.

More HERE: https://viking-armory.com/?page_id=723

On Line References Pistol

Glock:

Glock Downloadable Materials

Glock Training

Really good take down video (Not Gen 5)

Hit us up with comments or requests

All Documents posted on this site are for informational use only. If you make ANY modifications to your Weapons based on this site, you do at your own risk! If done incorrectly, you can render you weapon unsafe and / or unusable.

More HERE: https://viking-armory.com/?page_id=723

Reddit
error: Content is protected !!